
Airtable project tracker: a beginner’s guide to linked records

Your project budget is in one spreadsheet. The milestones are in another. Someone changes the budget, and now the team has to remember everywhere else it was copied.
This guide uses a fictional example to walk you through Airtable's basic capabilities. You'll learn how to decide what belongs in each table, connect projects to milestones, and keep shared information accurate as work changes. You can build the tracker from the instructions below; the video is an optional demonstration.
What Airtable adds to a spreadsheet
Airtable organizes information into workspaces, bases, tables, records and fields. A workspace holds bases. A base contains the tables for a system, such as project tracking. Each table holds one kind of thing. A row is a record; a column is a field with a defined type, such as a date, currency amount or status.
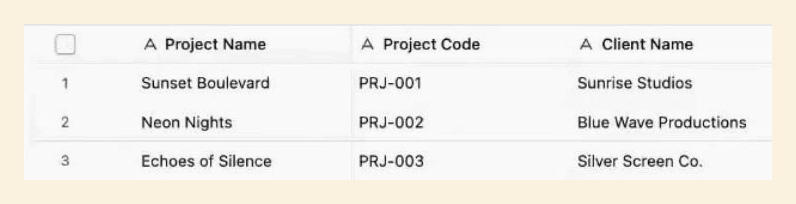
Each project gets its own row. Fields such as Project Name and Project Code describe that project; they do not need to be repeated on every milestone.
If you're comfortable with Google Sheets, the grid will feel familiar. The useful change is how records connect. A project can have several milestones, each with its own deadline and status. Linking those milestones to a project lets them refer to the same project details without maintaining separate copies.
That structure is useful when one thing has several related things: clients and projects, projects and milestones, or orders and line items. A simple list with a few dates may work perfectly well in a spreadsheet. Consider Airtable when you keep repeating the same information across rows or need different ways to work with connected records. Start in a test base where you have permission to create tables and fields.
Check your workspace and access before building
It's crucial that you start getting familiar with the settings for one main reason: it is easy to work in the wrong workspace. Confirm its name, then review its plan, collaborators, usage and billing information if your role allows it. Most workspace-level changes require an owner. If you're learning inside a system someone built for your team, ask its owner before changing the structure. Airtable's workspace settings guide explains these controls.
Separate the people who maintain the tracker from the people who use it. A builder needs permission to change fields and tables. A teammate updating a milestone needs access to the relevant records. Someone checking progress may only need to read them. Choose access based on the person's work.
Before inviting anyone, check which roles are billable under your workspace's plan or contract. An interface can provide a focused screen, but it does not automatically make access free. Review Airtable's collaborator billing rules alongside the access level you're about to grant.
Assignment notifications are a separate setting. A User field may offer “Notify users with base access when they're added.” Turning that off changes the notification; it does not remove access or cancel a paid seat. If assigning someone opens an invitation, check the proposed role before continuing. User field settings explain how assignments work.
Give projects and milestones their own tables
Before adding fields, write one sentence for each table: “One record represents one ___.” For this tracker, one Projects record represents a project, and one Key Milestones record represents a checkpoint or deliverable within that project. We'll use Sunset Boulevard as a fictional project so you can learn the structure without importing client information.
In Projects, start with Project name as the primary field, Project code as text, Start date and End date as Date fields, and Budget as Currency. These describe the project as a whole. A project code helps distinguish similarly named projects. Add a Project manager User field if the manager is an Airtable collaborator who needs an assignment.
In Key Milestones, use Milestone name as the primary field, Status as a Single select field, and Due date as a Date field. Start with a short status list: Not started, In progress, Blocked and Complete. Then add a Project field, choose Link to another record, and select Projects as the destination table. Allow one project per milestone for this tracker.
Put a detail on the record it describes. The overall budget belongs to the project. A milestone's deadline and status belong to the milestone. Keeping milestones in separate records lets you sort them by due date, see unfinished work and update one checkpoint without rewriting a project's notes.
Create the Sunset Boulevard record in Projects. In Key Milestones, create a Final Delivery record and select Sunset Boulevard in its Project field. The linked field connects the two records. Typing “Sunset Boulevard” into an ordinary text field would only store a name. When adding more milestones, select the existing project instead of creating another copy. See Airtable's linked-record guide for the field setup.

The relationship runs from one project to its milestones. Each milestone keeps its own details while referring to the same project record.
Use a lookup when you need a project detail on a milestone
A link answers “Which project does this milestone belong to?” A lookup answers “What is the budget on that project?” The lookup displays an existing value from the linked record. Keep the editable Budget in Projects and use a Project budget lookup in Key Milestones when that context is useful. A lookup will not create the project link for you.

Lookup configuration has two choices: the linked-record field to follow and the field to display from that record. Here, those choices are Project and Budget. The screenshot shows the first choice; use the exercise below to finish the setup and check the result.
Enter a fictional budget of $5,000 on Sunset Boulevard in Projects. This is sample data, not a CBM project value.
In Key Milestones, add a field called Project budget and choose Lookup.
Choose the Project linked-record field as the source, then select the Budget field from Projects.
Open the Final Delivery milestone and check that its Project budget shows $5,000.
Change the project’s budget to $6,000 in Projects. The linked milestone should now show $6,000 without a second manual edit.
The budget change checks whether the connection works. If the milestone still shows $5,000, check that Project budget is a Lookup field, that it follows the Project link, and that the link points to the record you edited. Airtable's lookup documentation covers the source and field settings.
Keep the meaning of that number clear: Project budget is the whole project's budget, not an allocation to one milestone. If three milestones each display $6,000, adding those values would count the same budget three times. If you need a budget for each milestone, create a separate Currency field called Milestone allocation and maintain those amounts deliberately.
Troubleshoot the connection before changing the data
For a blank lookup, check the milestone's Project link first. Then open that project and check its Budget. Finally, confirm that the lookup displays Budget and that any conditions are not excluding the record. A configured link field with no project selected is still an empty connection. Lookup troubleshooting lists the common causes.

These milestone cards each contain a Project link to Sunset Boulevard. Open the linked record to confirm the connection rather than relying on a matching name.
For an incorrect amount, follow the Project link and check which record it opens. Similar names can hide a duplicate project or an accidental link to the wrong one. Correct the link or the original project budget; do not replace the lookup with a manually typed value to make it look right.
For an editing or notification problem, check the person's role and the relevant field settings. A missing assignment notification does not, by itself, mean the person needs broader access. Confirm the assignment, notification preferences and existing permissions before changing a role.
Make the tracker useful for daily work
Once the records connect correctly, decide what a teammate needs to see each day. In Key Milestones, a view sorted by Due date helps you work through upcoming deadlines. A view filtered to exclude Complete keeps unfinished work visible. These are different ways to display the same records, so you do not need a separate table for each status.

A project interface can show a selected project alongside its milestones, with a separate status and target date for each. The underlying records remain in Projects and Key Milestones.
Use an interface when someone needs a focused working screen rather than the full base. Decide whether they need to review a project, update a milestone or both, then show the fields that support that task. Test what they can see and change with the intended permission level before inviting the team. Hiding a field in a view is not an access-control strategy.
Keep the first version small: one project view and one useful milestone view are enough to start. Ask a teammate to find their next deadline and update a status. If they cannot tell where to do that, improve the labels or layout before adding more fields.
Do you need AI to build this tracker?
No. You can create the tables, links, lookups and interface manually. If you use Airtable's Omni assistant, first check your organization's AI controls and available credits. Review the result against the same structure: one record per project, one per milestone, and the correct fields and permissions. AI can help build a screen; you still need to check that it represents the work correctly. See Airtable's AI access and usage guidance.
Leave instructions the next person can use
A tracker is easier to maintain when its rules are written down. Use the base guide to explain what each table contains, where shared information is edited, what each status means and who owns structural changes. Add the name of the person responsible for keeping milestone dates and statuses current.
For this setup, the core instruction is short: “Edit each project's Budget in Projects. Link milestones through the Project field. Project budget on a milestone is a lookup of the whole budget, not a milestone allocation. Update milestone dates and statuses in Key Milestones.”
Before moving real work into the tracker, test one fictional project with two milestones. Change its budget and confirm that both lookups follow it. Give the milestones different dates and statuses, then check that you can find the next unfinished item. When those checks work, you have a small tracker your team can understand and maintain. Add more fields or automation when a specific need appears.


Comments